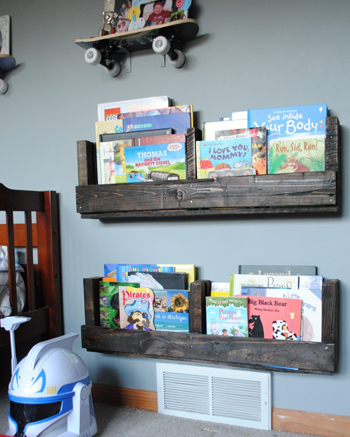
Hanging Pallet Bookshelf
This small hanging bookshelf is perfect for your child’s favorite books where they can easily reach them. The other nice thing is that they don’t take up any floor space and they can put their books away when they’re finished with them. One advantage to this type of bookshelf is that your child can see the front covers of their books.
This tutorial shows you how to use pallets but you can use any wood if you don’t have access to pallets. The bookshelves in these photos were stained with a dark stain, which is a good idea because it covers up imperfections and discolorations in the wood. If your pallet is large enough you can make 2 bookshelves from it, as each end of the pallet makes one bookshelf.
Instructions:
- Remove / pry off the center wood strip(s) from the pallet, using the back of a hammer or crowbar. This wood strip(s) will be reused for the bottom of the bookshelf. Pallets come in a few difference sizes, so yours may have 1 or multiple center wood strips. My pallet only had one, so I had to use a wood strip from another pallet to create the bottom for my second bookshelf.
- Reuse the center wood strip and attach it to the side of the pallet, which will soon be the bottom of your bookshelf. I reused the nails that were already in the wood strip, but you may need or want to use new nails.
- Measure about 1-2″ above the higher wood strip and make a mark for your cuts.
- Using a jigsaw, make your cuts.
- Once the cuts are done, your bookshelf is essentially complete.
- Sand down all the sharp edges using a hand sander or power sander.
- Stain. I used Minwax Jacobean stain for a dark look. The wood was quite porous, so it soaked it right up!
- Once completely dry (it took mine a few days to completely dry and not smell anymore), they were ready to hang. To hang the pallet bookshelves, I used Self-Drilling Drywall Anchors which are great to use when you can’t find a stud.
Jenna from Jenna Burger Designs made this tutorial when she made the bookshelves for her son’s room. She has photos showing her progress on her blog, Jenna Burger Designs.
Project and Image Source: Jenna Burger Designs